This topic explains how to manage users in Coursebox, including enrolling and removing learners, assigning roles and access levels, updating user details, and understanding the differences between Marketplace and Branded Training Platform permissions. It is designed to help administrators and course managers maintain accurate access, roles, and learner records across courses and the wider platform.
Watch the Tutorial Videos found in our Demonstration Video Library.
Access Levels – Marketplace vs Branded Platform
When building and delivering training through Coursebox, it's important to understand the key differences between using the Marketplace and a Branded Training Platform. While both models offer powerful tools for course creation, learner engagement, and collaboration, they serve different purposes and offer varying levels of control and customisation.
Marketplace
The Marketplace (my.coursebox.ai) operates under the Coursebox theme and is ideal for creators looking to publish and share courses to a broader audience. Managed by the Coursebox super admin, this setup is best for those who want to build their presence within the existing Coursebox ecosystem.
Here is what Marketplace offers:
Theme: Coursebox
URL: My.coursebox.ai
User Levels:
- Super Admin: Travis
- Creator and plus can:
- Create courses/groups (plus only)
- Invite course admins to collaborate
- Invite group admins to collaborate
- Enrol a user into a course as facilitator
- Learners can: be added as General Users without a profile.
Branded Training Platform
A Branded Training Platform (Business & Enterprise) is a white-labelled version of Coursebox hosted under the client’s own URL and branding. It offers greater autonomy, with the client acting as the super admin, and allows for custom roles, visual identity, and user management tailored to organisational needs.
Here is what Branded Training Platform offers:
Theme: Client Theme
URL: Client's URL
User Levels:
- Super Admin: Client's email
- Approved Experts (Admins) can:
- Invite course collaborators
- Invite group collaborators
- Enrol a user into a course as facilitator
- User Admins can: manage community/ users and theme
- Learners can: be added as General Users without a profile.
Manage Users and Groups
Sections below are for Business & Enterprise Accounts only. To upgrade your account go to: https://www.coursebox.ai/pricing
This feature allows course collaborators and facilitators to efficiently manage learner enrolment and collaboration settings within Coursebox. From this section, you can add or remove users, assign learners to specific groups, and control access to course content. Managing users and groups ensures a personalised and organised learning experience, allowing you to tailor content delivery, track progress by group, and streamline communication across cohorts. Whether you're working with individual learners or managing large training cohorts, this tool is essential for effective learner engagement and course management.

Plan Requirement
Access to the User ("Community") menu—which enables you to manage your users—is only available if you're on our Business or Enterprise plan. If your account is on a lower tier, you will need to upgrade to gain access to these user management capabilities.
Creator-level Permissions
As a Creator, you have the ability to:
Upload users via CSV, which is ideal for quickly adding large numbers of learners to your course.
Invite users by email, directly from the course-level “About” page—simply navigate to that page and click Users to send out invitations.
These Creator-level tools make enrolment streamlined and flexible at the individual course level.
Unenrolling learners
As a Course Administrator or Facilitator, you have the ability to unenroll learners from a course. In order to do this
- Visit the course about page as the course author or invited admin
- Click the people icon
- 3. Click the trash can to remove the learner from the course
Manage User Profile
Every member of the Coursebox Branded Training Platform (Premium) is provided with a personal profile page. This profile helps learners showcase their identity, learning progress, and contributions within the community. It also enables peer connection and expert visibility, making learning more social and engaging.

All members of Coursebox Branded Training Platform (Premium) will have their own profile page which they can edit.
- Go to right menu
- Click on down arrow
- Choose Profile

Add and Remove Learners Individually
Enrol a Learner
Coursebox allows you to add learners one at a time, making it simple to enrol individuals directly into your course or platform. This is especially useful when onboarding new learners gradually or managing enrolments outside of bulk CSV uploads.
You can assign specific roles, grant immediate access, and send a customised invitation—all from a single, user-friendly interface.
FROM THE TOP MENU
- Click the + sign in the top menu

- In the pop-up window, Add the name of the person you want to invite.

FROM THE COURSE
- Select the Share button and add the email of the person you want to invite.

Unenrol a Learner
Course admins can remove learners from a course whenever access needs to be updated or corrected.
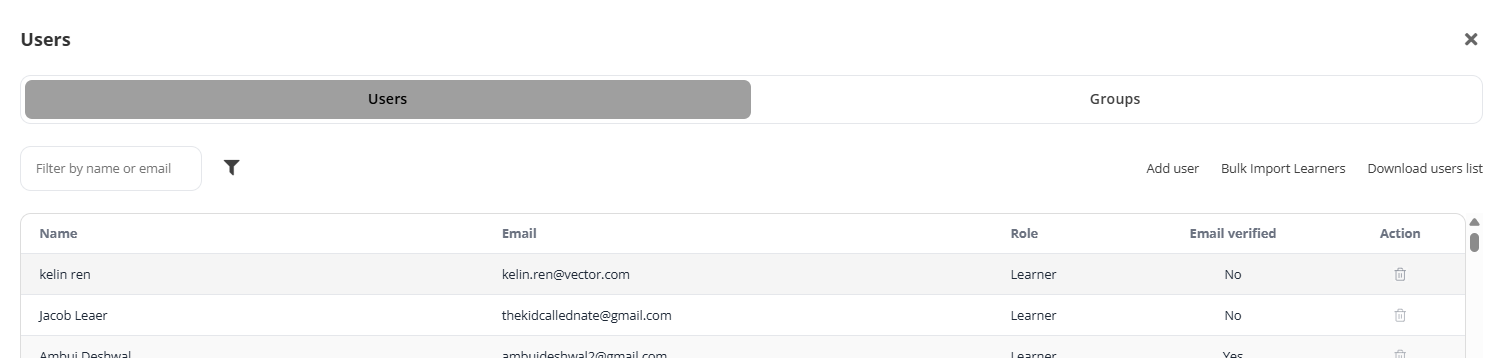
From the Course Editor, click the People icon located in the top-right corner of the page.
- This opens the Users panel. Ensure you are on the Users tab, where all enrolled participants are listed.
Find the learner you wish to remove from the course.
In the Action column, click the trash can icon to unenrol the learner from the course.
If the student is manually re-enrolled, progress is not lost, and the student will continue from exactly the same point where they were when enrollment was terminated.
Note: Learners cannot self-unenrol. Super admins must also be invited as course admins if they need to assist with managing enrolments.
Upload a CSV list of Learners
When you need to enrol multiple learners at once, Coursebox makes the process simple with CSV upload functionality. This bulk import method saves time by allowing you to add dozens—or even hundreds—of learners in a single action.
By uploading a properly formatted CSV file, you can quickly assign roles, enrol users into specific courses or groups, and trigger invitation emails, all while ensuring consistency and accuracy in your learner data.
- In the Users tab, click on the Bulk Import Learners link located next to "Add user."

To ensure correct formatting, click "Download sample CSV file".
This file will provide a template showing the expected structure—typically including columns such as:
First Name
Last Name
Email
Headline
Password (optional)
Confirm (optional)
Send (optional)
Accepted Terms (optional)

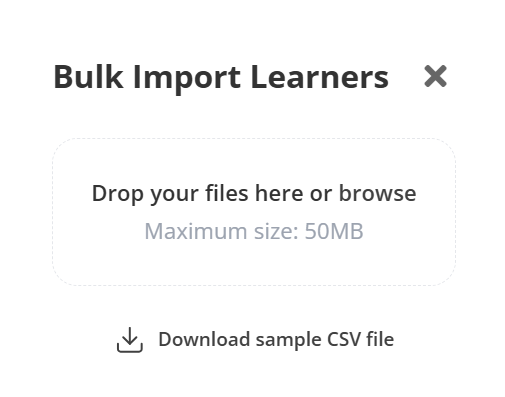
- Using the template as a guide, fill out the required user information in your CSV file. Save the file in .csv format and ensure it’s under the 50MB limit.
- Drag and drop your CSV file into the upload box, or click “browse” to select it from your device.
Once uploaded, Coursebox will process the file and assign the roles automatically based on the CSV content. You may receive a confirmation or error message depending on the data.
Return to the Users tab to verify that the learners were successfully added, and that their roles and email verification statuses appear correctly.
Manage User Status
By default, when a user is invited to Coursebox Branded Training Platform (Premium), they are automatically set as General Users. This is known as User Status on Coursebox Branded Training Platform (Premium).
Status change by User
Users are able to submit a change of status request to the Super admin:
Click profile

Click the pen beside profile name

In the profile settings, go to the ‘status’ section and choose the status from the dropdown menu.

You have 4 different status to choose from:
General
Learner
Approved Expert
Manager
For VIP and Approved Expert, changes in the status will trigger a request to Super Admin who can then approve or deny the change request.

Status change by Admin
Super Admin can also directly change the status of a user from their account.
Go to community section and click on the user’s profile whose status you want to change.

Click on the pen icon to edit the status.
Delete or Add the status you would want to assign to the user and click on Save.

Managing unconfirmed users
Unconfirmed users are the users who have not confirmed their email address yet.
In the community section, you can click on hourglass icon ![]() to view all the unconfirmed users.
to view all the unconfirmed users.
In order to resend invitation to unconfirmed users, you can click on send icon ![]() to automatically resend the invitation in bulk to all the unconfirmed users.
to automatically resend the invitation in bulk to all the unconfirmed users.

TIP: you can override the need for an unconfirmed user to confirm their account: click 'confirm email'

Add Facilitators
Adding a facilitator gives that person access to the course so they can support delivery, assist learners, and contribute to course management. This is also where you would grant access to members of the Coursebox Branded Training Platform (Premium) team if they are supporting your course setup or delivery.
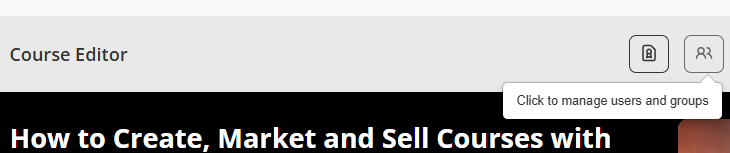
Navigate to the course where you want to add users and click the user icon (??) labeled "Click to manage users and groups" at the top of the course editor.
In the pop-up window, ensure you are on the Users tab (selected by default).
On the right side of the panel, click Add user.

In the “Add user” field, type the person’s email address (or name, if they’re already registered).
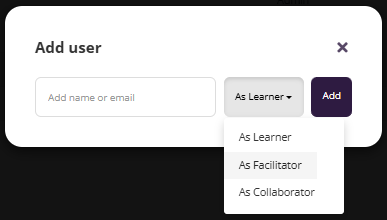
Use the dropdown next to the input box (default is As Learner) and choose As Facilitator
Once the email and role are selected, click the Add button. The user will be added to the course with the assigned role.
Add Collaborators
Adding a Collaborator gives that person full access to view, edit, and contribute to your course development. This is ideal when you are co-creating content, reviewing materials, or receiving support from colleagues. You can also grant collaborator access to team members from the Coursebox Branded Training Platform (Premium) if they are assisting you.
Add an Admin
In the Course Editor, click the Manage Users and Groups icon.

- Select Users

- On the right hand side select Add User

- Type ‘@’ and their name and their profile icon will pop up.

- From the dropdowns select Collaborator

- Then click add to confirm
Note: The person must already have a user profile in your platform before they can be added as a collaborator.
Delete a Collaborator
If you need to take away Collaborator access, follow these steps:
Open the profile of the person you want to remove as a Collaborator.

- Their current roles (e.g., Facilitator, Collaborator) will display under their name.

- Click the Edit icon (pencil) next to their name/status.
- A box will appear showing their active roles.

- Click the X next to Collaborator to remove their access.
- Save Changes
The user will now lose Administrator permissions but will still keep any other roles assigned (e.g., Learner, Facilitator, or Expert).
For Business & Enterprise Accounts only. To upgrade your account go to: https://www.coursebox.ai/pricingManage and update User Names and Types
Super Administrators can correct user type names (roles) and remove unused user types to keep the platform organised and ensure accurate role assignment.
From the user’s profile card, click the arrow down.
Select Update User from the dropdown menu.

The user profile screen will display the person’s name, profile picture, and current status (role).
Click the pencil icon next to the name or profile fields to edit.

Scroll to the Status field in the user details form.
Click on the current role tag (e.g., Approved Expert) to remove it.
Start typing the correct role name in the Status field and select it from the list of available roles.
Click Save to apply the changes.

Best Practices:
- Keep role names clear and consistent (e.g., Learner, Facilitator, Super Admin, Approved Expert).
- Avoid removing default system roles.
- Always reassign users before deleting a role.
Manage User Registrations
The Super Admin can control the ways in which users may register, including email or social media, as well as an option to synchronise Single-Sign-On with social media.
Navigate to Settings and select the preferred Registration methods.

Approve Experts
Coursebox allows users to request changes to their status—such as becoming an Approved Expert or Use Admin—while Super Administrators can review, approve, or update these statuses directly. Approved Experts can also be granted additional privileges, including influencer visibility and API access. This section explains how to manage user status requests, assign roles, and enable advanced permissions for key contributors on the platform.

Setting Approved Expert Status
Users are able to submit a change of status request to the Super admin:
Click profile

Click the pen beside profile name

Click Status > select Approved Expert
The Super Admin will receive a notification with an option to approve or reject the request.
Alternatively, the Super Admin may set a user’s status on the user’s profile page themselves.
Approved Expert as Influencer
Approved Experts may be set as an Influencer, which means all future users will follow the user’s newsfeed posts:
Navigate to Settings

Toggle on/off Approved Experts as an ‘Influencer’,

Approved Expert as API user
Approved Experts may be enabled to manage Zapier via Open API access:
- Navigate to Settings

- Toggle on/off Approved Experts as an ‘Open API’,

Was this article helpful?
That’s Great!
Thank you for your feedback
Sorry! We couldn't be helpful
Thank you for your feedback
Feedback sent
We appreciate your effort and will try to fix the article