This topic explains how to navigate your courses in Coursebox and configure key settings that control how a course is displayed, accessed, assessed, and managed. It covers course navigation views, advanced configuration options, ownership and visibility controls, and tools for organising, duplicating, and maintaining courses throughout their lifecycle.
Watch the Tutorial Videos found in our Demonstration Video Library.
Configure Advanced Course Settings
The Advanced Settings panel allows you to configure detailed options for your course, including sharing, grading, learner display, and time-based settings. These controls give you greater flexibility over how your course is presented and managed.
In your publish settings in your course:
- Go to your Publish Settings within your course.
- Select Advanced Settings to open the configuration window.

Social Sharing
By default, social sharing is enabled.
You can turn ON or OFF sharing buttons for:
Twitter (X)
LinkedIn
Facebook
When enabled, these icons appear as share buttons on the final topic page of the course.
If you prefer to keep your course private, simply toggle these options OFF.

Location
Use the Location field to specify where the course is delivered (for example, Online, Sydney, or Hybrid).
This is optional and mainly used for reporting or event-based courses.

Grading Method
Choose how learners are graded:
Completion
Learners pass by completing all required activities.Sum of Grades
Learners pass based on the total score across graded activities.
Select the option that best matches your assessment strategy.

Pass grade
Set the minimum percentage required to pass the course.
For example, a pass grade of 100 means all required components must be completed successfully.

Think about what an acceptable pass grade for your course is. There are many factors to consider such as the industry, or industry standards or complexity of the course.
Depending on the course you may want a 100% pass rate so consider the importance of the course and what is deemed satisfactory knowledge to pass.
For instance, I am a diabetes educator and when I did the training for commencing people on insulin pumps, the pass grade was 100%. I had to thoroughly know what I was doing because missing a step could be potentially life threatening.
Points system
Points can be assigned to the course if you are using a points-based or gamified learning model.
If not required, this can be left as 0.

Show total learners
When ON, learners can see the total number of users enrolled in the course.
When OFF, the total number of enrolled learners is hidden from learners.
This setting is useful for community-style or cohort-based learning experiences where visibility of participation supports engagement.
Note: This setting applies only to Coursebox courses and does not affect Arlo events.

Disable Content Protection (Disable Copy/Paste)
When ON, learners can freely download or copy course content without restrictions. When OFF Coursebox’s content protection is active, preventing downloads and limiting copying to protect intellectual property. It is recommended to keep this OFF unless the course content is intended for free distribution.

Duration
Define how long the course should take to complete.
Default duration is 1 hour
You can customise both hours and minutes
This duration is used for learner expectations and reporting.

Enrolment Length
Set how many days learners remain enrolled after their enrolment date.
If set to 0 or left blank, learners will not be automatically unenrolled
Useful for time-limited or compliance-based courses

Code (Arlo)
If Arlo integration is enabled:
Enter the Arlo course template code
The code must exactly match the template in Arlo
This ensures correct synchronisation between Coursebox and Arlo.

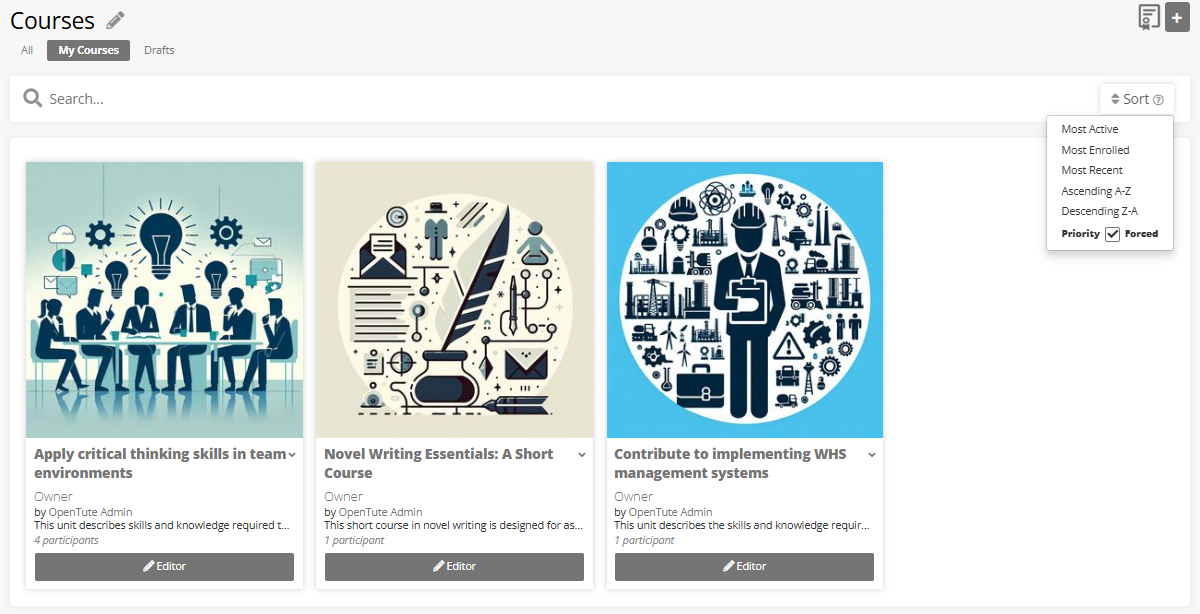
Set Course Priority for Display Order
Course priority helps control the display order of courses for learners and admins. By assigning a numeric value to each course, you can ensure high-priority courses appear more prominently—especially when using the "Priority Forced" sort option. This is particularly useful for spotlighting featured, time-sensitive, or compliance-mandatory courses.
- Navigate to the Courses section.
- Click on the Edit Course button for the course you want to prioritise.
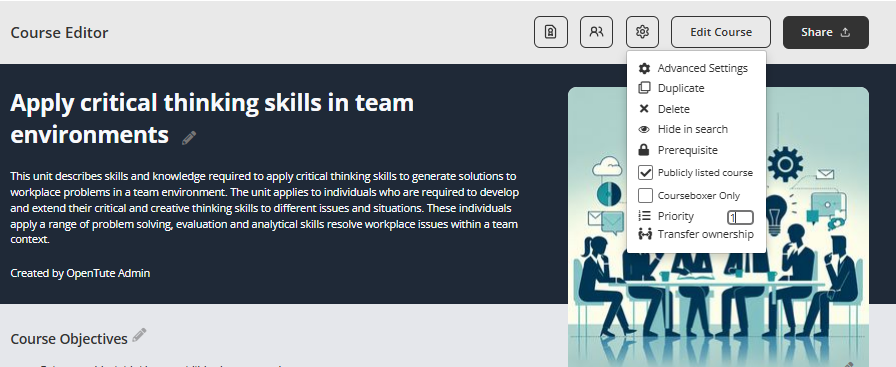
- Select the gear icon next to “Edit Course” to open advanced options.
- Locate the Priority option in the dropdown menu.
- Enter a numeric value in the Priority field:
Lower numbers = higher priority (e.g., 1 will be shown before 10).
Leave the value at 0 if no priority is needed.
- Go back to the main Courses view.
- Click the Sort dropdown at the top right.
- Select Priority, and ensure the Forced checkbox is ticked.
This will override other sort orders and display courses based on the priority number you’ve set.
Set Course Visibility & Ownership
The Administration Tools section provides guidance on managing user access, branding, system settings, and advanced platform features. These tools are designed to give administrators full control over how courses are delivered, tracked, and customised across the organisation.
Click on the ![]() in your course page to reveal the course administration tools.
in your course page to reveal the course administration tools.

Transfer Course Ownership
Super Admins can also transfer course ownership to another user when needed.
In Coursebox, Super Admins have the ability to transfer course ownership to another user. This is useful when a course creator changes roles, leaves the organisation, or when ongoing course management needs to be reassigned. The new owner will have full control of the course, including editing rights and administrative privileges.
- Navigate to the course you want to transfer and click Edit Course from the top right menu.
- Click the gear icon (⚙️) next to the Edit Course button to open additional settings.
- From the dropdown menu, click on Transfer ownership at the bottom of the list.

- A pop-up window will appear. Use the search bar to find the user you want to assign as the new course owner.
- Click Transfer ownership to complete the process.

Duplicate a Course
The Duplicate feature lets you create a copy of an entire course, which will appear in your Drafts. This is a valuable time-saving tool when you want to reuse an existing course structure.

You might use it to:
- Build a shorter or condensed version of a course
- Tailor the same content for a different audience or language level
- Experiment with changes without affecting the original course
Duplicating a course helps streamline course creation while maintaining consistency across programs.
Delete a Course
The Delete function allows you to permanently remove a course from your drafts or course list. This is useful if the course is no longer needed or was created by mistake.

When you click Delete, a confirmation message will appear to ensure the action is intentional. You can choose to cancel at this stage if needed.

Note: Use this option with care, as deleted courses cannot be recoveredHide a Course from Search
If you prefer to keep a course hidden from search results, you can use the Hide in Search option. This prevents others from discovering the course until you're ready to share it. When you're ready to make the course visible again, simply click Make Visible to restore its discoverability.

Set Prerequisites for Learning Pathways
While many courses can be taken independently, some learning pathways may require the completion of a prior course before progressing. For example, Course 1 might need to be completed before accessing Course 2.
- Go to the course you want to set the prerequisite.
- In the top-right corner, locate the settings (gear) icon next to Edit Course.
- From the dropdown menu, select Prerequisite (lock icon).
- This option allows you to specify another course that must be completed first.

- Once “Prerequisite” is enabled, you can select which course (e.g., Course 1) must be completed before learners can access this one.

Set a Publicly Listed Course
When a course is marked as Publicly Listed, it becomes visible to anyone browsing your training portal. This means the course will:
- Appear in search results and catalog listings
- Be accessible to learners without needing a private link
- Support broader visibility and enrolments across your audience

This setting is ideal if you want to:
Promote courses to the general public
Offer open-access learning experiences
Increase discoverability for marketing, community, or awareness campaigns
If the checkbox is left unticked, the course remains hidden from public search. In that case, learners will need a direct link or specific invitation to access it.
⚠️ Note: Public listing does not override enrolment permissions. You can still apply pricing, prerequisites, or access restrictions as needed.
Was this article helpful?
That’s Great!
Thank you for your feedback
Sorry! We couldn't be helpful
Thank you for your feedback
Feedback sent
We appreciate your effort and will try to fix the article