Coursebox integrates with a range of external platforms and standards to support secure authentication, eCommerce, automation, legacy content, and enterprise system connectivity. This page provides an overview of the available integrations—including SAML, WordPress/WooCommerce, Arlo, SCORM, Zapier, and the Open API—and explains how to configure and use them within your Coursebox environment.
SAML Integration with Coursebox
Coursebox supports SAML 2.0-based Single Sign-On (SSO), allowing users to authenticate using their existing organisation credentials. This provides a secure and seamless login experience for learners, admins, and facilitators—particularly within enterprise or institutional environments.
Coursebox: (Endpoints that needs to be configured at SAML IDP)
- EntityID/ISSUER: urn:auth0:coursebox-sso:coursebox
- ReplyURL/ Assertion consumer Service URL: https://coursebox-sso.au.auth0.com/login/callback?connection=coursebox
- SignON URL(URL to initiate SSO): https://{{portal_domain}}/auth/auth0/token
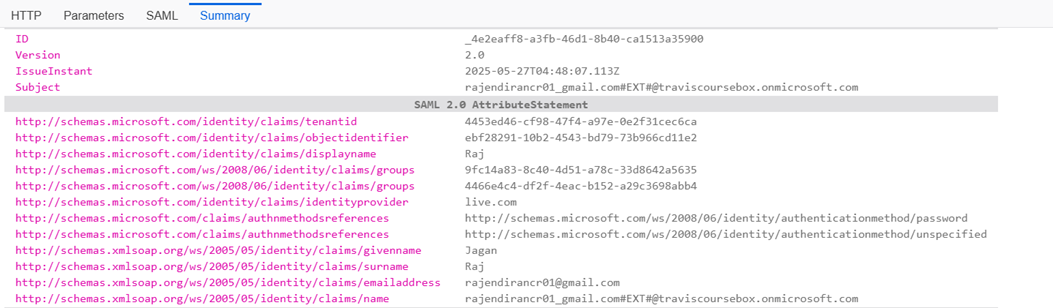
- User Attributes expected to be passed from IDP:
- givenname
- surname
- emailaddress
- uniqueuseridentifier(uuid) (if any other than emailaddress)
- group (user_admin, approved_expert, learner)
Note: If IDP can pass only the group ID instead of the group Display names, Kindly share us the GroupID equivalent to each groups(user_admin, approved_expert, learner)PFA the SP metadata too:
Sample SAML Token claims that’s expected from any Identity Porvider to integrate with coursebox:
Details That IDP need to provide to coursebox:
- SAML IDP metadata in XML format
- Sample SAML Token containing all the claims of the user that will be generated by IDP
- Test user for each group
WordPress Plugin integration with WooCommerce
The Coursebox WooCommerce Plugin seamlessly connects your Coursebox account with your online store, making it easy to sell your existing courses directly through WooCommerce.
With this integration, your courses can be listed as products in your store, and customers are automatically enrolled in the correct course as soon as they complete their purchase. No more manual enrollments — saving you time and simplifying your workflow.
This integration lets you combine Coursebox’s powerful AI-driven course creation and management features with the flexibility of WooCommerce, giving you full control over sales, enrollments, and the customer experience.
Quick Start Guide – Coursebox WooCommerce Plugin
Step 1: Install & Activate
Upload the plugin files to
/wp-content/plugins/course-boxor install it directly from the WordPress Plugins screen.Go to Plugins → Installed Plugins and click Activate.
Make sure WooCommerce is installed and active.
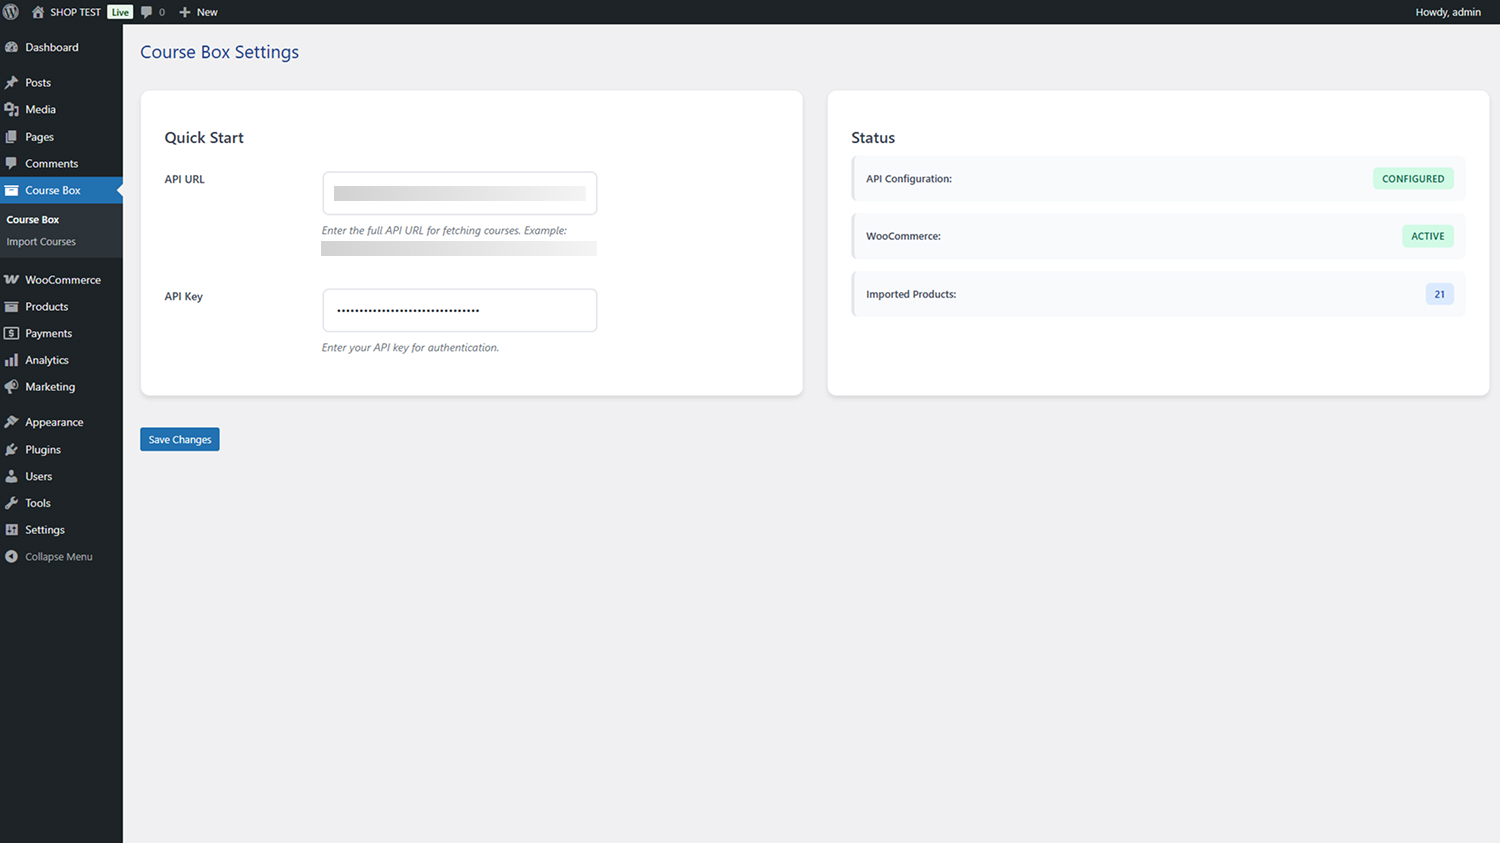
Step 2: Connect to Coursebox
- Go to Course Box → Settings

- Get your API URL and API Key.

- Go to WordPress and enter API URL and API Key to connect to your Coursebox Account.
- Once saved, you’ll see the status update to “Configured” and “Active.”
Step 3: Import Your Courses
Navigate to Course Box → Import Courses. Here, you’ll see all your available Coursebox courses with images, descriptions, and import options. Simply click Import Course to bring a course into your WooCommerce store.

Step 4: Publish Your Courses
Once imported, each course is listed as a WooCommerce product. You can adjust pricing, categories, and tags directly in WooCommerce, just like any other product. Customers can then add courses to their cart and purchase as usual.

For more information, view the WordPress Plugin Directory information.
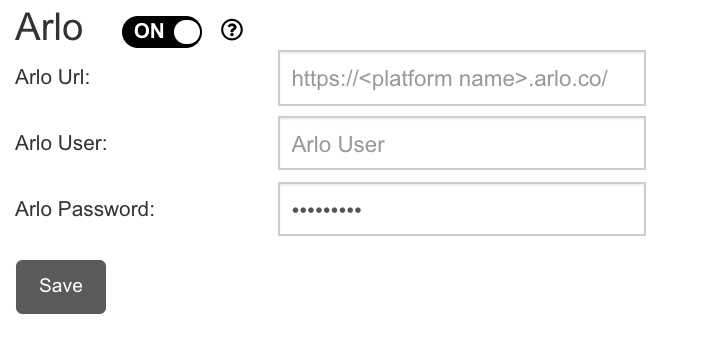
Sync Arlo
The Super Admin can sync Arlo accounts with Coursebox Branded Training Platform (Premium) by simply providing Arlo’s login URL and credentials.
*This document assumes that the user is familiar with Arlo and has basic understanding of the integration.Importing a SCORM File
SCORM stands for “Sharable Content Object Reference Model”. It is a standard course content file type which is adopted by traditional eLearning systems to create a course.
If you already have a SCORM file then you can import the file into Coursebox Branded Training Platform (Premium) to automatically create the entire course with a click of a button.SCORM integration is perfect for including simulations, branching scenarios, or assessments built in third-party tools while keeping everything accessible within your Coursebox course.
Tip: For more information related to SCORM, visit the Wikipedia page to learn more.
Using SCORM you can create a highly interactive course which takes advantage of all the HTML 5 features.
The Steps are:
- Prepare Your SCORM Package. Ensure your SCORM file is a zipped package (.zip) and compatible with SCORM 1.2 or SCORM 2004 standards.
- Navigate to the course where you want to add the SCORM content.

- Select SCORM from the menu.
- Click Upload File, then select your SCORM .zip file from your computer.
Coursebox API Guide for Enterprise Clients
For Business & Enterprise Accounts only.  To upgrade your account go to:
https://www.coursebox.ai/pricing
The Coursebox API allows enterprise clients and training organisations to automate learner management, integrate course data into other platforms (like CRMs, HR systems, or ERPs), and build custom user experiences.
Before You Start
Requirements:
Endpoints
Authentication
Login: Authenticate users with their email and password to receive an access token.
Endpoint:
POST /auth/loginHeaders:
Content-Type: application/json
Request Body:
{
    "email": "<email>",
    "password": "<password>"
}
Response: Returns an access token for authenticated requests in
token:id parameter.
User Management
Register a New User
Create a new Coursebox user.
Endpoint:
POST /api/wineusers/createAccountHeaders:
X-Access-Token: <access_token>Request Body:
{
    "data": {
        "user": {
            "firstName": "<firstname>",
            "lastName": "<lastname>",
            "email": "<email>",
            "password": "<password>"
        },
        "offerCode": "",
        "marketingEmails": true,
        "is18Plus": true
    }
}
Retrieve User Details
Fetch user information by their ID.
Endpoint:
GET /api/WineUsers/<userid>Headers:
X-Access-Token: <access_token>
Edit User Details
Edit a Coursebox user.
Endpoint:
POST /api/WineUsers/updateMainAttributes?id=<userid>
Headers:
X-Access-Token: <access_token>
Request Body:
{
    "id": <userid>,
  "attributes": {
    "realm": <realm>,
    "email": <email>,
    "emailVerified": <emailVerified>,
    "fullName": <fullName>,
    "firstName": <firstName>,
    "lastName": <lastName>,
    "title": <title>,
    "contactNumber": <contactNumber>,
    "dateOfBirth": <dateOfBirth>,
    "headline": <headline>,
    "avatarUrl": <avatarUrl>,
    "profile": {
      "background": <background>
    },
    "country": <country>,
    "city": <city>,
    "location": <location>,
    "region": <region>,
    "state": <state>,
    "zipCode": <zipCode>,
    "status": [<status>],
    "rate": <rate>,
    "rateAdditionalTax": <rateAdditionalTax>,
    "price": <price>,
    "currency": <currency>,
    "additionalTax": <additionalTax>,
    "isDiscountCodeUsed": <isDiscountCodeUsed>,
    "calendlyLink": <calendlyLink>,
    "personalSite": <personalSite>,
    "companySite": <companySite>,
    "linkedIn": <linkedIn>,
    "twitter": <twitter>,
    "facebookLink": <facebookLink>,
    "instagramLink": <instagramLink>,
    "facebookId": <facebookId>,
    "googleId": <googleId>,
    "linkedinId": <linkedinId>,
    "appleId": <appleId>,
    "customerId": <customerId>,
    "stripeId": <stripeId>,
    "isDeleted": <isDeleted>,
    "isPlatformUpdates": <isPlatformUpdates>,
    "isAdmin": <isAdmin>,
    "isExpertRequested": <isExpertRequested>,
    "isExpertApproved": <isExpertApproved>,
    "organisationCode": <organisationCode>,
    "isVIPRequested": <isVIPRequested>,
    "isVIPApproved": <isVIPApproved>,
    "isChannelPublished": <isChannelPublished>,
    "isCoursePublished": <isCoursePublished>,
    "newEmail": <newEmail>,
    "isSideBarVisible": <isSideBarVisible>,
    "isTopBarVisible": <isTopBarVisible>,
    "channelsPageTabs": <channelsPageTabs>,
    "peoplePageTabs": <peoplePageTabs>,
    "elibraryPageTabs": <elibraryPageTabs>,
    "resourcesPageTabs": <resourcesPageTabs>,
    "lastActiveAt": <lastActiveAt>,
    "isInActive": <isInActive>,
    "isTrial": <isTrial>,
    "inIframe": <inIframe>,
    "referer": <referer>,
    "username": <username>,
    "credentials": <credentials>,
    "challenges": <challenges>,
    "created": <created>,
    "lastUpdated": <lastUpdated>,
    "id": <id>,
    "createdAt": <createdAt>,
    "updatedAt": <updatedAt>,
    "isUserAdmin": <isUserAdmin>,
    "isVIP": <isVIP>,
    "isBoxer": <isBoxer>,
    "isPro": <isPro>,
    "isApprovedExpert": <isApprovedExpert>,
    "isExpert": <isExpert>,
    "isLearner": <isLearner>,
    "isFollowed": <isFollowed>
  }
}
Course Management
Invite User to a Course
Send an invitation for a user to join a course.
Endpoint:
POST /api/Courses/inviteUserForCourse
Headers:
X-Access-Token: <access_token>
Request Body:
{
    "data": {
        "firstName": "<firstname>",
        "lastName": "<lastname>",
        "courseid": <courseid>,
        "email": "<email>"
    },
    "courseId": <courseid>,
    "title": "",
    "body": ""
}
Enroll User in a Course
Add a user to a specific course.
Endpoint:
POST /api/Courses/<courseid>/enrolUser
Headers:
X-Access-Token: <access_token>
Request Body:
{
    "id": <courseid>,
    "userId": <userid>
}
Remove User from a Course
Unenroll a user from a course.
Endpoint:
DELETE /api/Courses/<courseid>/users?userid=<userid>Headers:
X-Access-Token: <access_token>
Retrieve Available Courses
Fetch a list of available courses.
Endpoint:
GET /api/Courses/findCourses?pageOptions={"my":true}
Headers:
X-Access-Token: <access_token>
Retrieve Course Details
Fetch details of a specific course.
Endpoint:
GET /api/Courses/findCourse?id=<courseid>
Headers:
X-Access-Token: <access_token>
Get Course Content
Retrieve content for a specific course page.
Endpoint:
GET /api/Activities/<activityId>
Headers:
X-Access-Token: <access_token>
Get Course Learners
Retrieve a list of learners enrolled in a course.
Endpoint:
GET /api/Courses/<courseid>/allLearnersHeaders:
X-Access-Token: <access_token>
Get Course Administrators
Retrieve a list of course administrators.
Endpoint:
GET /api/WineUsers/getUserForMentio?params={"all":true,"ids":"<courseid>"}
Headers:
X-Access-Token: <access_token>
Error Handling
The Coursebox API returns standard HTTP status codes:
200 OK – Request successful
400 Bad Request – Invalid request
401 Unauthorized – Invalid authentication token
404 Not Found – Resource not found
500 Internal Server Error – Issue on the server side
Best Practices
- Always use HTTPS and manage secrets securely.
- Limit token lifespan for security.
- Add rate limiting logic on your system if building public interfaces.
FAQs
Q: Can I use this API to push results or assessments?
A: Not in this version. Please contact your Coursebox rep for advanced LTI or webhook support.
Q: Can I access this via Zapier?
A: Yes, a Zapier integration is available here: https://zapier.com/apps/coursebox-lms/integrations
Need Help?
For any questions or custom endpoints requests, contact: Coursebox Support at support@coursebox.ai
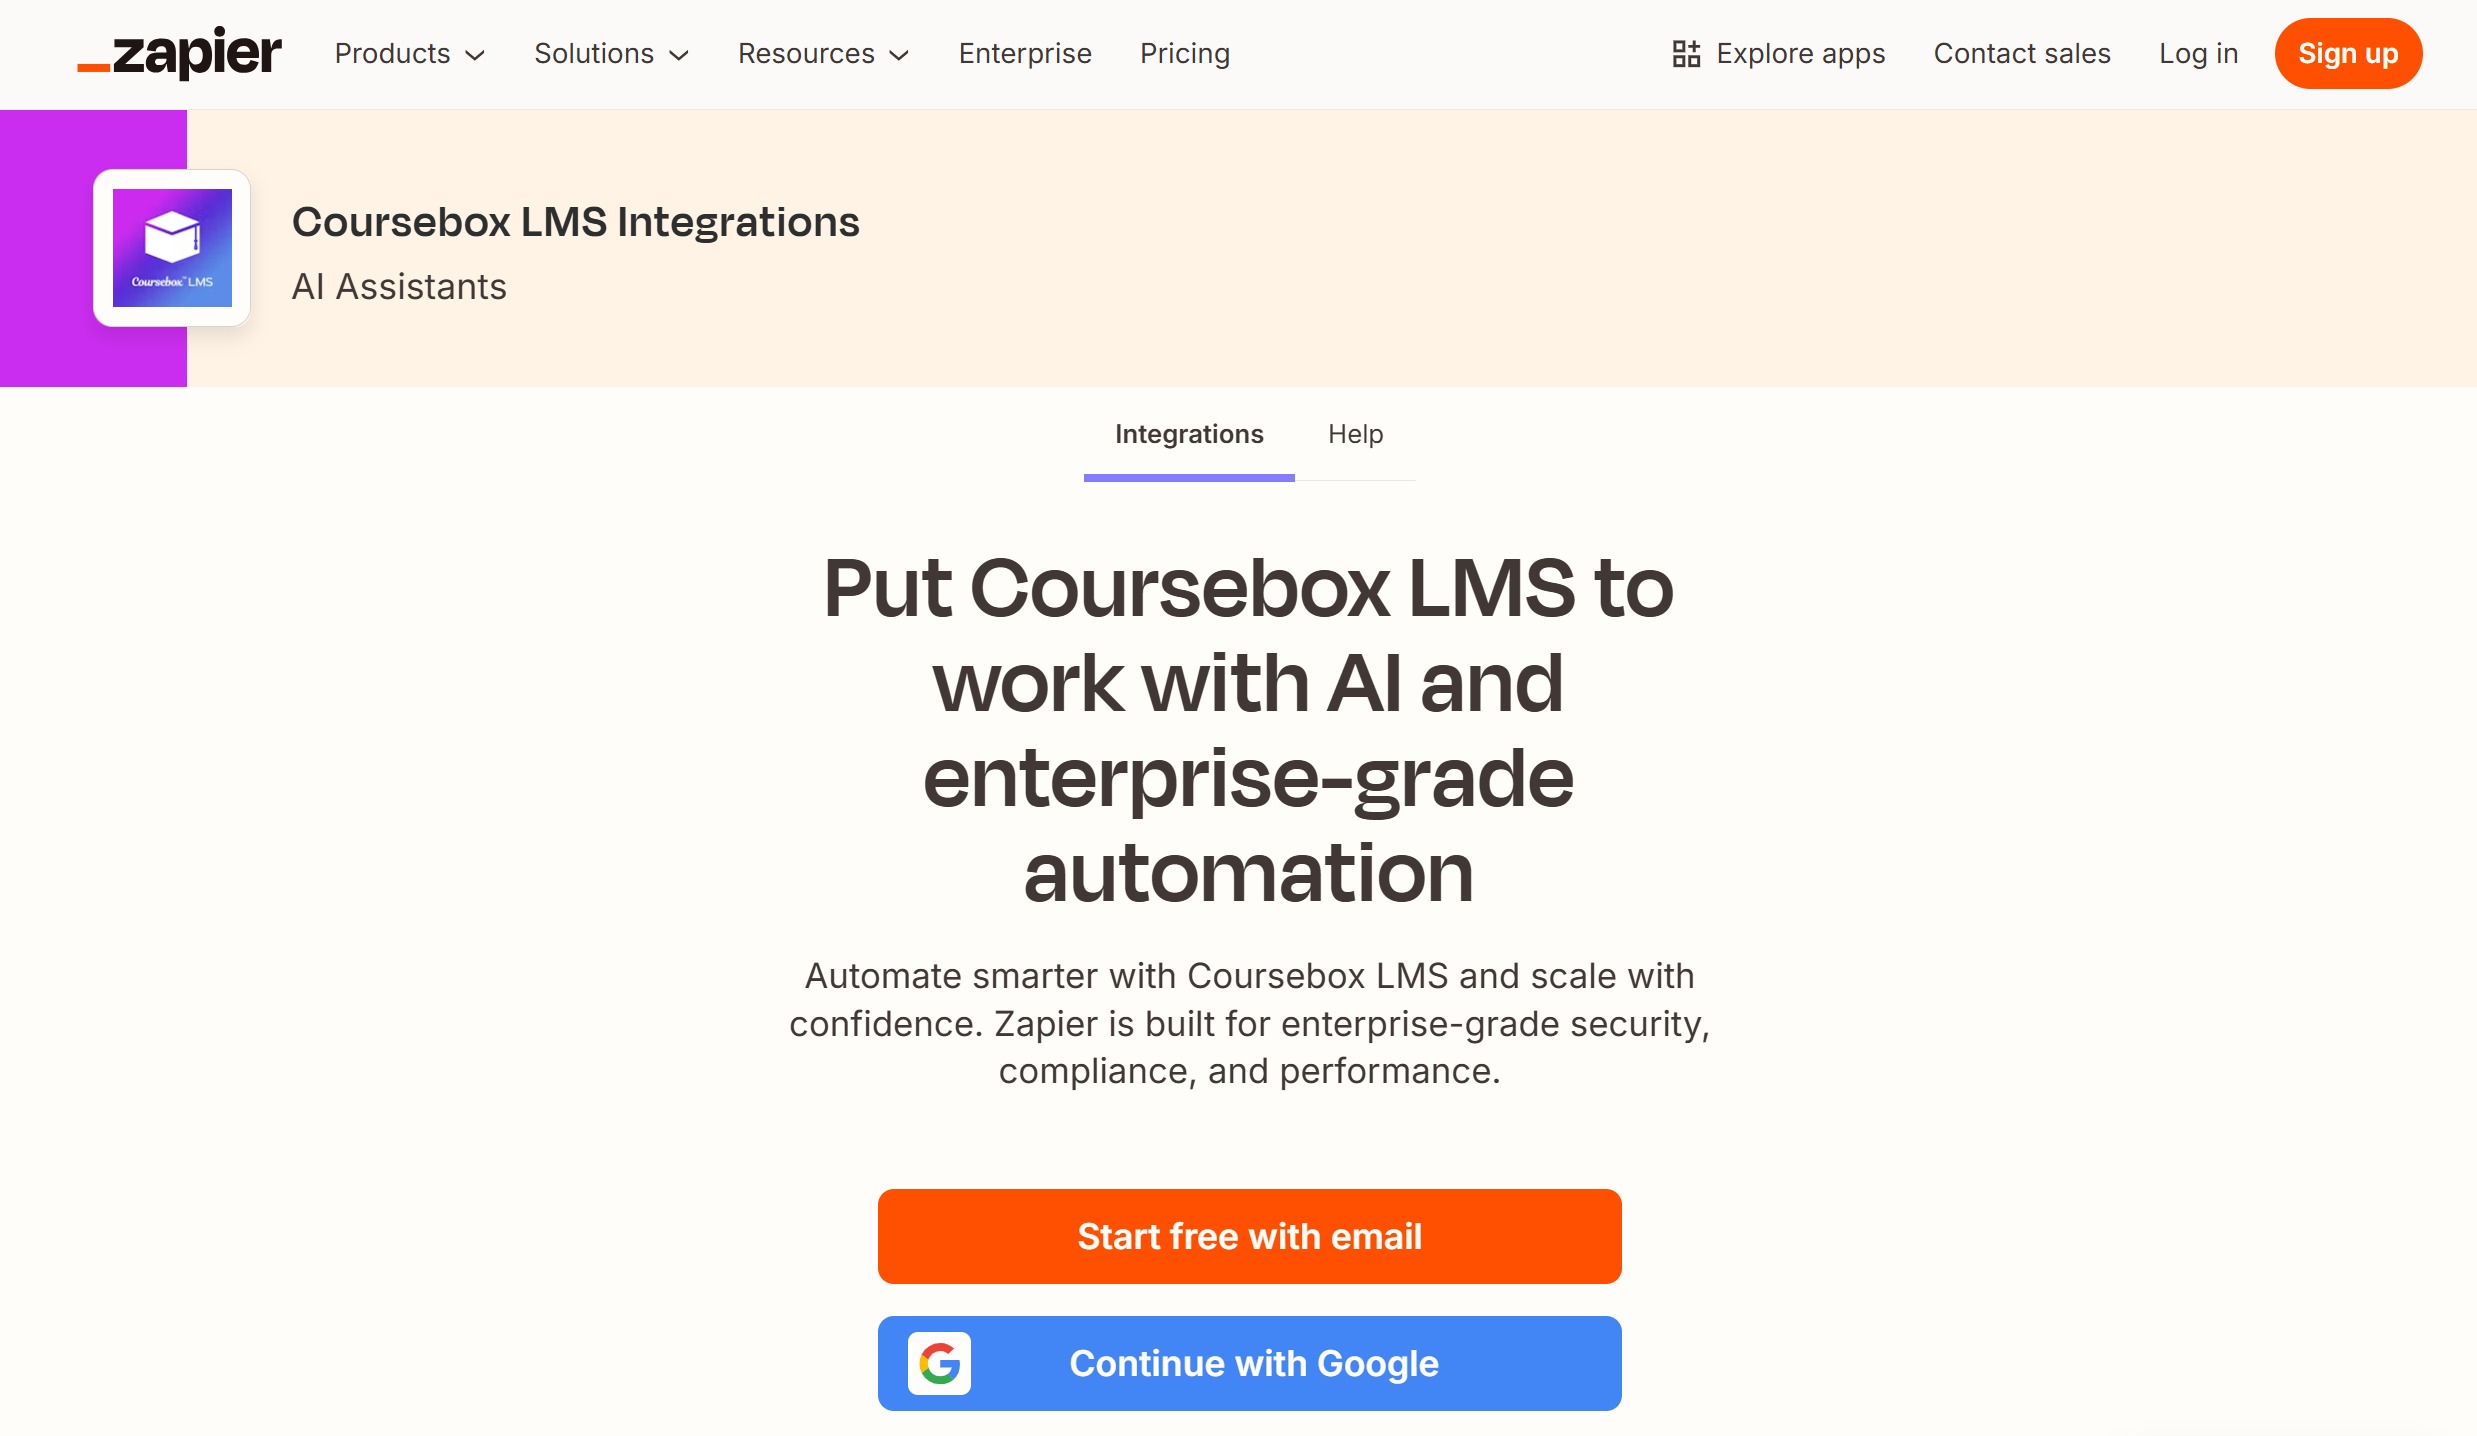
Integrate Zapier
Zapier allows you to connect Coursebox with hundreds of other applications to automate tasks such as enrolling users, updating profiles, and tracking completions — without writing any code.
Popular Zapier Use Cases for Coursebox
Below are 20 high-quality Zapier integration examples you can use in your documentation. Each includes:
- What it does (use case)
- Trigger app + trigger event
- Coursebox action(s)
- Step-by-step setup structure (matching your screenshot style)
All examples assume Coursebox is already connected in Zapier using:
- API Key (Settings → Open API)
- Coursebox Domain (e.g.
https://yourportal.coursebox.ai)
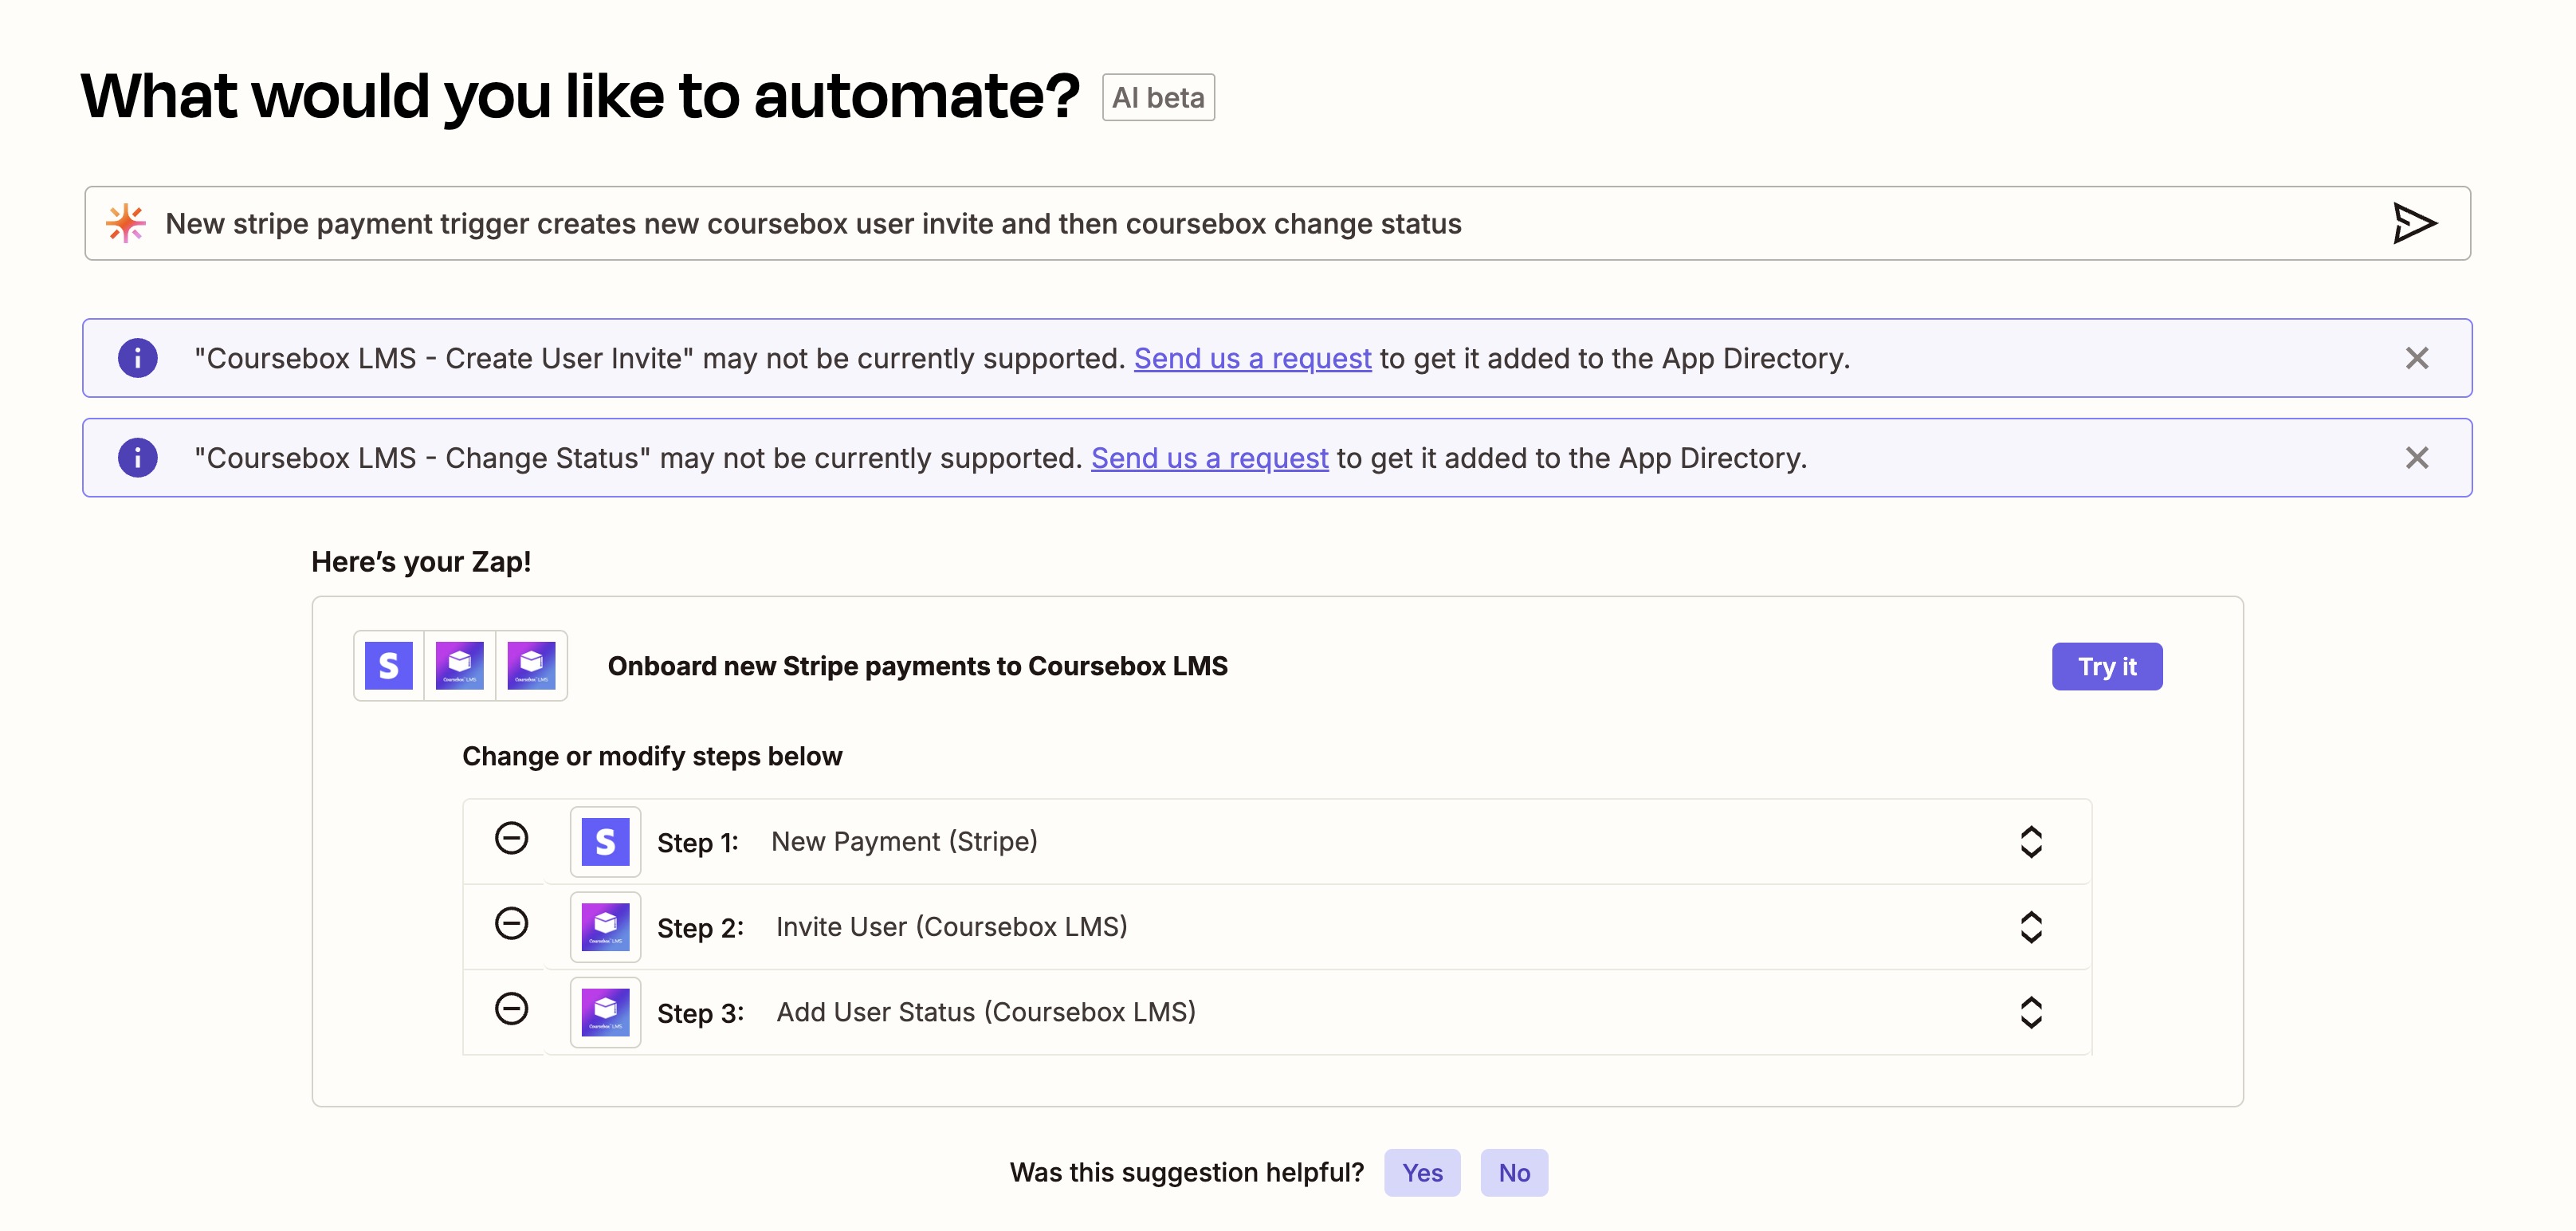
1. Stripe Payment → Invite User → Enrol Into Course
Automatically enrol paying customers into a course.
Trigger
Stripe – New Payment
Actions
Coursebox – Invite User
Coursebox – Enrol Into Course by Code
Steps
Step 1: New Payment (Stripe)
- Trigger: Successful payment
- Map: Customer Email, Name
Step 2: Invite User (Coursebox LMS)
- Email → Stripe Customer Email
- First Name → Stripe First Name
- Last Name → Stripe Last Name
Step 3: Enrol Into Course by Code (Coursebox LMS)
- User → Map User ID from Step 2
- Course Code → e.g.
AI101
2. Calendly Booking → Enrol Into Event
When someone books a session, automatically enrol them in a live Coursebox event.
Trigger
Calendly – Invitee Created
Actions
Coursebox – Invite User
Coursebox – Enrol Into Event
Steps
Step 1: Invitee Created (Calendly)
Step 2: Invite User (Coursebox) → Map invitee email
Step 3: Enrol Into Event → Map User ID from Step 2
3. Eventbrite Registration → Enrol Into Course
Trigger
Eventbrite – New Attendee Registered
Actions
Invite User
Enrol Into Course
Flow
- New Attendee (Eventbrite)
- Invite User (Coursebox)
- Enrol Into Course by Code
4. Facebook Lead Ad → Invite + Assign Status
Trigger
Facebook Lead Ads – New Lead
Actions
Invite User
Set User Status
Flow
- New Lead
- Invite User
- New User Status → e.g. “Prospect”
5. Google Sheets Row Added → Invite + Enrol
Trigger
Google Sheets – New Spreadsheet Row
Actions
Invite User
Enrol Into Course
Ideal for bulk onboarding from a spreadsheet.
6. HubSpot Deal Won → Enrol Into Premium Course
Trigger
HubSpot – Deal Stage Changed to Closed Won
Actions
Invite User
Enrol Into Course
Set Custom Field
7. Shopify Order → Grant Resource Access
Trigger
Shopify – New Paid Order
Actions
Invite User
Enrol Into Resource
8. Typeform Submission → Enrol Into Free Course
Trigger
Typeform – New Entry
Actions
Invite User
Enrol Into Course
9. Gmail Label Added → Add User Status
Trigger
Gmail – New Label Added
Action
Set User Status
Example: Label = “VIP Client”
10. Zoom Webinar Registration → Enrol Into Event
Trigger
Zoom – New Webinar Registrant
Actions
Invite User
Enrol Into Event
11. Course Completed → Send Slack Notification
Trigger
Coursebox – Course Completed
Action
Slack – Send Channel Message
12. New User Registered → Add to Mailchimp Audience
Trigger
Coursebox – New User
Action
Mailchimp – Add Subscriber
13. User Enrolled in Course → Create Google Calendar Event
Trigger
Coursebox – User Enrolled in Course
Action
Google Calendar – Create Event
14. Course Completed → Issue Certificate via Accredible
Trigger
Coursebox – Course Completed
Action
Accredible – Create Credential
15. New Course Published → Post to LinkedIn
Trigger
Coursebox – New Course
Action
LinkedIn – Create Post
16. New User Subscription → Send Invoice in Xero
Trigger
Coursebox – New User Subscription
Action
Xero – Create Sales Invoice
17. New Event Created → Create Zoom Meeting
Trigger
Coursebox – New Event
Action
Zoom – Create Meeting
18. Airtable Record Updated → Update Profile
Trigger
Airtable – Updated Record
Action
Coursebox – Update Profile
Map updated phone, organisation, job title.
19. Cancelled Stripe Subscription → Unenrol From Course
Trigger
Stripe – Subscription Cancelled
Action
Unenrol From Course
20. SurveyMonkey Submission → Set Custom Field + Enrol
Trigger
SurveyMonkey – New Response
Actions
Invite User
Set User Custom Field
Enrol Into Course
Mapping Instructions (Dynamic User Field)
When enrolling into a course, event, or channel:
- Do not choose a static name.
- Click Insert Data / Custom.
- Select User ID from the Invite User step.
- Test the Zap to confirm correct enrolment.
Prefer:
user.id(best practice)- Email (fallback option)
Integrate Zapier and Open API
Using Coursebox’s Open API and Zapier integration, you can build workflows that save time and ensure seamless user management.
Access Your Open API Key
To connect Coursebox with Zapier, you’ll need your API Key.
Log in as a Super Admin.
Go to Settings → Open API.
Copy the displayed API Key for use in Zapier.
If needed, click Reset API Key to generate a new one.

Allow Expert Access (Optional)
If you’d like specific team members to access integrations, turn on Approved Experts under your settings.
Hide User Counter on Login Page
On the login page, Coursebox displays the number of users in your community. If you prefer not to show this number, you can easily hide it.
Find the option Hide user counter.
Toggle to ON to hide the counter.
When enabled, the user count will no longer appear on the login page.

Access the Zapier Integration
Open your course and click Publish this course.
Select the Zapier icon located below the sharing options.

You’ll be directed to the Coursebox LMS Integrations page on Zapier.
Sign in or create a Zapier account using email or Google login.
Connect Coursebox to Zapier
When setting up a Zap with Coursebox, you’ll be prompted to connect your Coursebox account.
This connection allows Zapier to communicate securely with your learning platform and perform actions automatically.
How to Connect
In Zapier, select Coursebox LMS as your app.
When prompted, enter the following:
API Key – found in your Coursebox Settings → Open API section.
Coursebox Domain – your portal’s URL (e.g.,
https://my.coursebox.ai).
Click Continue to authorise the connection.
You can reset your API Key at any time to generate a new one.
This adds an extra layer of security and ensures your integrations remain private and protected.
Zapier Integration Options
Once your Coursebox account is connected, you can use it as either a Trigger (an event that starts an automation) or an Action (a task Zapier performs).
Coursebox Trigger Options
These triggers start your Zaps when specific events occur in Coursebox:
| Trigger | Description |
|---|---|
| New Course | Fires when a new course is published. |
| New Event | Fires when a new event is created. |
| New Resource | Fires when a new resource is added. |
| New User | Fires when a new user registers in Coursebox. |
| New User Subscription | Fires when a user subscribes to a plan or feature. |
| New User Status | Fires when a new status is assigned to a user. |
| User Enrolled in Course | Fires when a user is enrolled in a course. |
| User Enrolled in Event | Fires when a user joins an event. |
| User Enrolled in Resource | Fires when a user gains access to a resource. |
| Course Completed | Fires when a user completes a course. |
Coursebox Action Options
These are the actions Zapier can perform inside Coursebox after a trigger occurs:
| Action | Description |
|---|---|
| Enrol Into Course by Code | Enrols a user into a course using a unique course code. |
| Enrol Into Event | Enrols a user into a specific event. |
| Enrol Into Resource | Gives a user access to a resource. |
| Enrol Into Resource Directory | Adds a user to a resource directory. |
| Invite User | Creates a new user in Coursebox and sends them an invitation. |
| Remove User Custom Field | Deletes a custom field value for a user. |
| Remove User Status | Removes an assigned user status. |
| Set User Custom Field | Adds or updates a user’s custom field value. |
| Unenrol From Channel | Removes a user from a channel. |
| Unenrol From Channel by Code | Removes a user from a channel using a code. |
| Unenrol From Course | Removes a user from a course. |
| Unenrol From Course by Code | Removes a user from a course using a code. |
| Unenrol From Event | Removes a user’s event enrolment. |
| Unenrol From Resource | Removes a user’s access to a resource. |
| Unenrol From Resource Directory | Removes a user from a resource directory. |
| Update Profile | Updates a user’s profile details in Coursebox. |
Enrol into channel
Follow These Steps
- Open Step 3 – Coursebox LMS: Enrol Into Channel.
- In User, don’t pick a name from the list.
- Instead, map the value from a previous step:
- If you’re in Zapier: click the Custom tab (or “Insert data”), then choose the User ID (or Email) output from Step 2 – Invite User.
- If you’re in Make (Integromat): click the { } / Add variable icon next to the field and select the User ID (or Email) from Invite User.
- Keep Channel as your chosen channel (e.g., IEP Ambassador Program – Oct 2025).
- Test: run the workflow with a sample spreadsheet row. It should:
- Create/invite the user (Step 2) → returns a User ID
- Enrol that same user into the channel (Step 3)
- Prefer User ID returned by the Invite User step (often labeled
user.id,Coursebox User ID, or similar). - If ID isn’t available, map the Email—the enrol action accepts email in most Coursebox app versions.
- If Zapier/Make doesn’t show fresh outputs, re-run Test on Step 2 to pull a new sample.
Quick Toubleshooting
- No ID in outputs? Expand “Show all”/“More” to reveal hidden fields; re-test Step 2.
- Multiple users enrolled? Make sure you’re mapping a single value (the invited user), not a collection.
- Still seeing Static? You can leave the “Static” list closed and insert the variable directly—once a variable is mapped, it’s dynamic even if the UI label says “Static”.
Was this article helpful?
That’s Great!
Thank you for your feedback
Sorry! We couldn't be helpful
Thank you for your feedback
Feedback sent
We appreciate your effort and will try to fix the article